
| Home | Reference | Manpage | Examples | Download | License | Contact |
| GRIDPLUS2 - Tree |  |
||||||
|
| GRIDPLUS Tree |
In order to simplify creation of screens GRIDPLUS provides a GRIDPLUS tree command mode. This uses a simple syntax to create a tree widget with optional scrollbars. The GRIDPLUS tree can have its contents set using the gpset command. A selected node in the GRIDPLUS tree can be read, in the same manner as other GRIDPLUS widgets, from the "null" array. A node can be selected either by using the mouse -or- the gpselect command.
It is possible to have a menu pop-up when a node is selected using a right-click. The menu is created using the GRIDPLUS menu command and is associated with the tree by specifying the -menu option.
| GRIDPLUS Tree Node Options |
| Selecting a Tree Node |
A single-click anywhere on a line in the tree will select the node. The value of the "null array" item (in this case ".mytree") will be set to the hierarchic name of the node.
For Example:
Clicking on the "File4" node will display...

...and set the value of "$(.mytree)" to "/Dir1/File4".
A tree node can also be selected using the gpselect command.
For Example:
gpselect .mytree /Dir1/File4
| Invoking a Command When Selecting a Node |
The -action option allows a command to be invoked when a tree node is selected. By default the node is selected and no command is invoked.
There are two -action options which invoke a command:-
| -action single | A single-click will select the node and invoke the item command. |
| -action single/space | A single-click or pressing the spacebar will select the node and invoke the item command. |
| -action double | A single-click will select the node and a double-click invoke the item command. |
By default the name of invoked command is based on the name of the tree item. If the tree is called ".mytree" the command invoked will be "mytree".
The -command option can be used to explicitly specify the name of the command to be invoked.
| Examples |
This section contains examples which illustrate the main GRIDPLUS tree command mode features.
The following example assumes that the reader is familiar with the contents of the Grid/Layout page. Information given on that page will not be duplicated here.
Note: The examples assume that the GRIDPLUS package has already been "required" and the commands imported.
Window:
Source Code:
Comments:
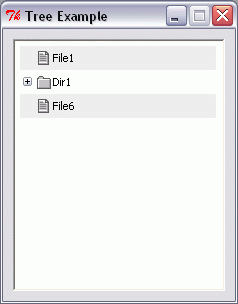
This example creates a tree with a default size (200 units wide, 10 lines deep).
The -open option is set to "0"
by default.
The gpset command creates 8 nodes in the tree (See
"Reading and Setting GRIDPLUS Tree Values").
Expanding and Contracting the Tree:
Clicking on the
...Similarly, clicking on the
Clicking on the
Window:
Source Code:
Comments:
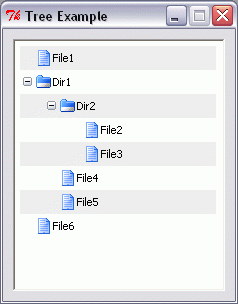
In this example the
-fileicon filedocument16 and
-folder folder16 options are
used to set the default "File" and "Folder" icons.
Also, the -open 1 option
is used to display the tree contents fully expanded when set using gpset.
Window:
Source Code:
Comments:
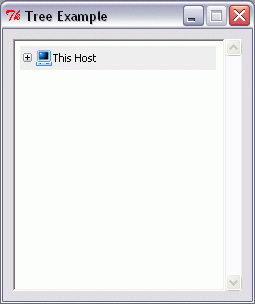
This example creates a tree with a default size (200 units wide, 10 lines deep),
using the -scroll y option to add a "Y" direction
(vertical) scollbar.
The "File" and "Folder" icons are set using the option database.
This example also demonstrates use of the Tree Node Options when
setting the contents of the tree using gpset.
For Example:
{/Host/DiskA + "A: (Floppy)" :devfloppyunmount16}
Creates a node called "/Host/DiskA" as a folder ("+"), which is displayed
in the tree with a text label of "A: (Floppy)" using the "devfloppyunmount16"
icon from the ICONS package.
Expanding and Contracting the Tree:
Clicking on the
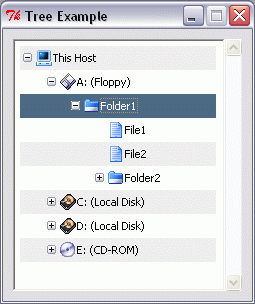
Clicking on the
...and so on...
...and so forth.
Tree Example 1
gridplus tree .mytree -width 200

gridplus layout .main -wtitle "Tree Example" {
   .mytree
}

pack .main

gpset .mytree {
   /File1
   {/Dir1 +}
   {/Dir1/Dir2 +}
   /Dir1/Dir2/File2
   /Dir1/Dir2/File3
   /Dir1/File4
   /Dir1/File5
   /File6
}
 image to the left of the "Dir1" folder
will display...

 image to the left of the "Dir2"
folder will display...
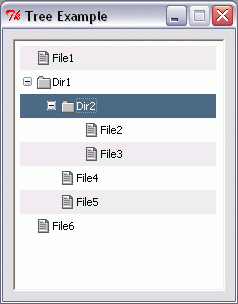
 image to the left of the "Dir1" folder
will display...

Tree Example 2
gridplus tree .mytree -fileicon filedocument16 -foldericon folder16 -open 1 -width 200

gridplus layout .main -wtitle "Tree Example" {
   .mytree
}

pack .main

gpset .mytree {
   /File1
   {/Dir1 +}
   {/Dir1/Dir2 +}
   /Dir1/Dir2/File2
   /Dir1/Dir2/File3
   /Dir1/File4
   /Dir1/File5
   /File6
}
Tree Example 3
option add *Gridplus.fileIcon   filedocument16
option add *Gridplus.folderIcon folder16

gridplus tree .mytree -scroll y -width 200

gridplus layout .main -wtitle "Tree Example" {
   .mytree
}

pack .main

gpset .mytree {
   {/Host + "This Host" :devpc16}
   {/Host/DiskA + "A: (Floppy)" :devfloppyunmount16}
   {/Host/DiskA/Folder1 +}
   {/Host/DiskA/Folder1/File1}
   {/Host/DiskA/Folder1/File2}
   {/Host/DiskA/Folder1/Folder2 +}
   {/Host/DiskA/Folder1/Folder2/File3}
   {/Host/DiskC + "C: (Local Disk)" :devdiskunmount16}
   {/Host/DiskC/Folder1 +}
   {/Host/DiskC/Folder1/File1}
   {/Host/DiskC/Folder1/File2}
   {/Host/DiskD + "D: (Local Disk)" :devdiskunmount16}
   {/Host/DiskD/Folder1 +}
   {/Host/DiskD/Folder1/File1}
   {/Host/DiskD/Folder1/File2}
   {/Host/DiskD/Folder1/Folder2 +}
   {/Host/DiskD/Folder1/Folder2/File3}
   {/Host/DiskE + "E: (CD-ROM)" :devcdunmount16}
   {/Host/DiskE/Folder1 +}
   {/Host/DiskE/Folder1/File1}
   {/Host/DiskE/Folder1/File2}
}
 image to the left of the "This Host" folder
will display...
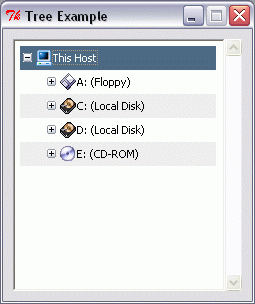
 image to the left of the "A: (Floppy)" folder
will display...

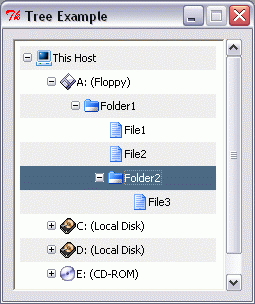
| Reading and Setting GRIDPLUS Tree Values |
The values of the GRIDPLUS widgets are stored in a global array with a null name.
For Example:
global {}
For GRIDPLUS tree widgets the array element has the same name as the widget frame: Thus the value of ".mytree" is referenced as "$(.mytree)".
Note: For the GRIDPLUS tree, the (full hierarchic name) value of the selected node is stored in the array. If no row is selected the value of the array element is null.
The recommended method to set GRIDPLUS tree values is to use the gpset command.
For Example:
gpset .tree {
   /File1
   {/Dir1 +}
   {/Dir1/Dir2 +}
   /Dir1/Dir2/File2
   /Dir1/Dir2/File3
   /Dir1/File4
   /Dir1/File5
   /File6
}
Tree items support two node types; "file" and "folder". Folders can be expanded and may contain files and/or folders. Although the nodes are refered to as files/folders they may be used for any purpose. The default icons reflect the file/folder use, but using the ICONS facility other icons may be specified, both as defaults and on a per node basis.
Each item in the gpset value list represents a node in the tree. The "+" character is used to specify that the node is to be a "folder".
Each node is defined by specifying its full hierarchic name. The names of the containing folders are delimited using the "/" character. Thus...
/Dir1/Dir2/File2
Creates a file node called "File2", contained within folder "Dir2" which is contained within the folder "Dir1". Nodes to be created at the root level have a "/" prefix.
NOTE: The list of nodes specified to gpset must be sorted into the required order.
Setting Specific Text For a Node:
By default, the text shown in the tree widget for this example will be "File2". It is possible, however, to show text which is not based on the hierarchic name of the node. For example...
{/Dir1/Dir2/File2 "My Favourite File"}
...will create a node called "/Dir1/Dir2/File2", but the text shown in the tree widget will be "My Favourite File".
Setting Specific Icon For a Node:
By default, the icons displayed for "file" and "folder" nodes are as shown in Example 1.
It is possible to these defaults by using the -fileicon and -foldericon options (See Example 2) -or- by using the "Gridplus.fileIcon" and "Gridplus.folderIcon" option database settings (See Example 3).
It is also possible to set the icon displayed for a particular node by specifying the name of the icon to be displayed with a ":" prefix. For example...
{/Host/DiskA + "A: (Floppy)" :devfloppyunmount16}
...will create a "folder" node called "/Host/DiskA", with text "A: (Floppy)" and the "devfloppyunmount16" icon.