| Home | Reference | Manpage | Examples | Download | License | Contact |
| GRIDPLUS - Notebook |  |
||||||
|
| GRIDPLUS Notebook |
In order to simplify creation of screen layouts, GRIDPLUS provides a GRIDPLUS notebook command mode. This is used to create a paged notebook similar to the familiar "Tabbed Notebook". A later release of GRIDPLUS may use the "Tabbed Notebook" look, but for simplicity I have created a similar effect using buttons to select the Notebook pages.
| Examples |
This section contains an example which illustrates the main GRIDPLUS notebook command mode features.
The following example assumes that the reader is familiar with the contents of the Grid/Layout, Entry, Checkbutton and Radiobutton pages. Information given on those pages will not be duplicated here.
Note: The example assumes that the GRIDPLUS package has already been "required" and the commands imported.
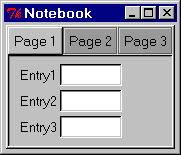
Window:
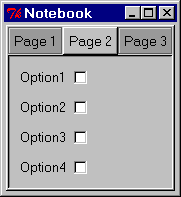
Pressing the "Page 2" button displays the following window:-
Note: In this example the size of the notebook changes to match the size of
its contents. Example 2 demonstrates a method to
fix the notebook size.
Source Code:
Comments:
Three GRIDPLUS widget Grids are created: ".mypage1", ".mypage2" and
".mypage3". Each of these Grids is to be a Notebook page.
Note: Any GRIDPLUS Grid or Layout can be a Notebook page.
A GRIDPLUS Notebook is created named ".mynotebook". The Notebook has the
"-relief raised" option set to giv ethe Notebook a raised border. The
internal relief of the Notebook page area can be set using the -irelief
option. By default "-irelief" is set to "sunken".
The Notebook layout has a line for each page. The first item in each line defines the
text to appear on the button used to select the page. The second item defines the name
of the GRIDPLUS Grid/Layout that will form the page.
Window:
Pressing the "Page 2" button displays the following window:-
Source Code:
Comments:
The Notebook part of this example is the same as Example 1;
However, The GRIDPLUS Entry grid has a null item at the "bottom" of the grid. This
will allow the grid to stretch without anchoring "Entry3" to the bottom of the grid.
The GRIDPLUS Layout named ".main" stretches the Notebook to fill its cell
(".mynotebook:nsew"), the size of which (in this example) is controlled by
the GRIDPLUS Grids ".mygrid1" and ".mygrid2".
Notebook Example 1


gridplus entry .mypage1 {
   {"Entry1" .e1}
   {"Entry2" .e2}
   {"Entry3" .e3}
}

gridplus checkbutton .mypage2 {
   {"Option1" .cb1}
   {"Option2" .cb2}
   {"Option3" .cb3}
   {"Option4" .cb4}
}

gridplus radiobutton .mypage3 {
   {"Option1" .rb1 -option1}
   {"Option2" .rb2 -option2}
   {"Option3" .rb3 -option3}
   {"Option4" .rb4 -option4}
}

gridplus notebook .mynotebook -relief raised {
   "Page 1" .mypage1
   "Page 2" .mypage2
   "Page 3" .mypage3
}

gridplus layout .main -title "Notebook Example" {
   .mynotebook
}

pack .main
Notebook Example 2


gridplus grid .mygrid1 -relief groove {
   {"Label1"}
   {"Label2"}
   {"Label3"}
   {"Label4"}
   {"Label5"}
   {"Label6"}
}

gridplus grid .mygrid2 -relief groove {
   {"Label1"} {"Label2"} {"Label3"} {"Label4"} {"Label5"}
}

gridplus entry .mypage1 {
   {"Entry1" .e1}
   {"Entry2" .e2}
   {"Entry3" .e3}
   {}
}

gridplus checkbutton .mypage2 {
   {"Option1" .cb1}
   {"Option2" .cb2}
   {"Option3" .cb3}
   {"Option4" .cb4}
}

gridplus radiobutton .mypage3 {
   {"Option1" .rb1 -option1}
   {"Option2" .rb2 -option2}
   {"Option3" .rb3 -option3}
   {"Option4" .rb4 -option4}
}

gridplus notebook .mynotebook -relief raised {
   "Page 1" .mypage1
   "Page 2" .mypage2
   "Page 3" .mypage3
}

gridplus layout .main -title "Notebook Example" {
   .mygrid1:ew .mynotebook:nsew
   .mygrid2    -
}

pack .main
Copyright © 2004 Adrian Davis.